General Maintenance
Mostly, refer to the Official Owners Manual for regular and general maintenance.
Lift
Some maintenance tasks are better performed with the wheels off the ground.
The armored pan under the battery that protects onboard charging units is strong enough and positioned well to use a center lift.
Recommendation
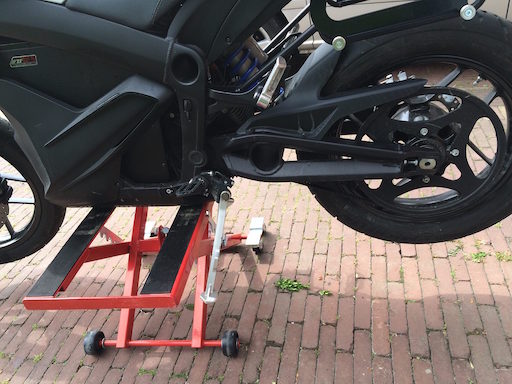 Center lift under S model belly pan
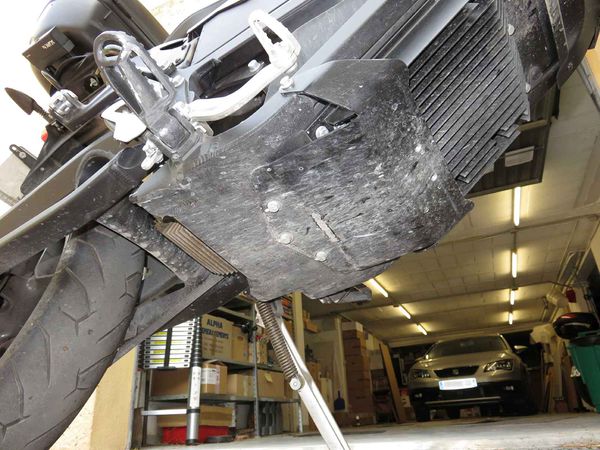 FXS from below.
Using a scissor lift center stand is an easy method to lift the bike.
Rage Powersports BW-1604A has been spotted at Zero HQ, but other manufacturers make very equivalent stands.
A center lift is easier than a rear stand to operate solo, and it is more compact than the rear stand although much heavier.
Location (S Platform)
Use a center lift under the battery compartment.
- Orient the center stand so that it runs side-to-side to provide lateral stability.
- Place it under the rear of the battery compartment to lift the bike's front and rear equally.
- Place it under the front of the battery compartment to lift the bike's front and leave the rear tire in floor contact.
- Strap the bike securely (through the center frame tube, say) to avoid toppling it.
Confirmed fits
- Drag Specialties Center Jack (all models) uses a 15/16 hex wrench to raise and lower the lift.
- Generic Lift uses a 7/8 hex wrench/socket; should work for all models, confirmed for 2014 SR.
Location (X Platform)
The FXS (at least) has three bolts sticking out from the pan under the bike.
- Orient the center stand so that it runs side-to-side to provide lateral stability.
- You can put a rubber pad on your lift to make it easier to use it over the bolts.
Confirmed fits
- MSR Pro Lift Stand for the FX, but not other models (even FXS) because of height issues.
References
- Discussion thread
- Video of DSR lifted by scissor jack.
- Rage Powersports BW-1604A scissor jack unboxing by [E Shattow on YouTube]:
Front Stand
When To Use
A front stand is the easiest way to:
- Perform Front Wheel Removal.
- Remove and replace the Belly Pan.
Spool Stands
- The Zero does not offer axle attachment points for spools for a front stand.
Steering Head Pin Stands
- 2014+ models(?) have a steering pin diameter of 5/8".
- 2012-2013 Zero models have an 8mm diameter (from a 2013 Zero S report and some checking around), with no vendor match.
- The DS/DSR/FX models' high front fender must be removed (or drilled through) to use a pin for the front steering head.
Confirmed fits
- Pit Bull offers Pin #7, Front to fit the 5/8" steering pin diameter.
- Pit Bull Hybrid Dual Lift Stand Zero S/SR/DS/FX (Order should automatically include pin #7).
Verify your steering stem before ordering.
| Years | Platform | Front Pin | Rear Pin | Rear Supports | Restraint |
|---|---|---|---|---|---|
| 2013 | S & X | None! (8mm ⌀) | Pin Fitting Only - Zero Motorcycles (Axle: 23-04736) | Top Supports (Pair), Standard Rear Stand Top Supports (Pair), SS Rear Stand |
Trailer Restraint System - Zero Motorcycles (Axle: 23-04736) |
| 2014 | 〃 | Pin #7, Front | 〃 | 〃 | 〃 |
| 2015+ | 〃 | 〃 | Pin Fitting Only - Zero Motorcycles (Axle: 23-08032) | 〃 | Trailer Restraint System - Zero Motorcycles (Axle: 23-08032) |
Rear Stand
Inexpensive Jack Stands and a 2x4
- Will Burk shared his technique Cheap and Easy Motorcycle Lift for raising the rear wheel off the ground with a pair of jack stands and a 2x4:
Swingarm attachment
The Zero does not offer swingarm attachment points for spools for a rear stand.
A rear stand can work if it cradles the underside of the swingarm snugly.
This can work but takes a little care to operate single-handedly.
Confirmed fits
- Pit Bull Standard Rear Stand
- Pit Bull Forward Handle Standard Rear Stand
- Haul-Master 1000 Lb. Capacity Motorcycle Swingarm Rear Stand (Harbor Freight)
Axle Attachment
Custom Fabrication
An axle stand can be fabricated, like this Home made rear axle stand on Zero FXS.
| Years | Platform | Front Pin | Rear Pin | Rear Supports | Restraint |
|---|---|---|---|---|---|
| 2013 | S & X | None! (8mm ⌀) | Pin Fitting Only - Zero Motorcycles (Axle: 23-04736) | Top Supports (Pair), Standard Rear Stand Top Supports (Pair), SS Rear Stand |
Trailer Restraint System - Zero Motorcycles (Axle: 23-04736) |
| 2014 | 〃 | Pin #7, Front | 〃 | 〃 | 〃 |
| 2015+ | 〃 | 〃 | Pin Fitting Only - Zero Motorcycles (Axle: 23-08032) | 〃 | Trailer Restraint System - Zero Motorcycles (Axle: 23-08032) |
Tools
See the separate Tool Kits article for a curated short list of tools with their purposes.
NOTE: integrate or meld notes below with that article.
Tools and parts to support your bike
A travel kit for a motorcycle is always a good idea, but Zero doesn't include a default set. They do sell a tool kit which covers many common tasks.
Tools for Everyday Riding
- Torx T45 for MY2015+ to remove the seat for fuse block access.
- 3mm allen key for tank plastics and headlamp upper mount screws.
- 4mm allen key for headlamp lower mount screws.
- 5mm allen key for the front brake lever and front wheel pinch bolt.
- Tire pressure gauge.
- 10mm, 13mm wrench (or monkey wrench) for belt tension adjustment and front brake calipers.
Consumables
These collect useful spare parts for FST Platform models.
Spare Parts for Everyday Riding
- 12V fuses (10A, 15A typically).
- Tire patch kit, suitable for tubed (pre-2015 DS or FX bikes) or tubeless tires (all others).
- Cable ties and electrical tape for wiring.
Spare Parts for Travel
~$90, only available from Zero.
Expect to eventually use it as replacement; avoids a delay waiting on delivery.
Pre-Ride Checklist
| Item | What to Check | Look For | Check Off | |
|---|---|---|---|---|
| Tires And Wheels | Tires | Condition | Tread depth, wear, weathering, evenly seated, bulges, embedded objects. | Front & Rear |
| 〃 | 〃 | Air Pressure | Check When Cold; Adjust to Load | 〃 |
| 〃 | Wheels | Spokes | Bent/broken/missing. Check tension at top of wheel: "ring" is okay, "thud" means loose. | 〃 |
| 〃 | 〃 | Cast | Cracks or dents | 〃 |
| 〃 | 〃 | Rims | Out of round by more than 5mm. Spin the wheel against a stationary pointer | 〃 |
| 〃 | 〃 | Bearings | Grab the tire and flex it; no freeplay (click) between the hub and axle; no growl or squeak when spinning. | 〃 |
| 〃 | 〃 | Seals | Cracked or torn, no grease | 〃 |
| 〃 | Brakes | Function | Each brake alone can hold the bike stationary | 〃 |
| 〃 | 〃 | Condition | Worn pads or discs | 〃 |
| Controls | Handlebars | Condition | Bars are straight, turn freely, handgrips and bar ends are secure. | |
| 〃 | Brake Lever / Brake Pedal | Condition | Not broken/bent/cracked; adjusted properly. | |
| 〃 | 〃 | Pivots | Lubricated | |
| 〃 | Brake Hoses | Condition | No cuts/cracks/leaks/bulges/chafing/deterioration. | |
| 〃 | 〃 | Routing | No interference or pull at the steering head; no sharp angles; support clamps in place. | |
| 〃 | Throttle | Operation | Moves freely; snaps closed. | |
| Lights & Electrics | Headlamp/Running light | Condition | Turns on; no cracks; mounted securely; clean reflector. | |
| 〃 | 〃 | Aim | Just below horizontal and not skewed left or right. | |
| 〃 | Tail Lights | Condition | No cracks; clean and bright. | |
| 〃 | 〃 | Operation | Running light always on; brighter with front or rear brake pressed. | |
| 〃 | Switches | Operation | All switches function correctly: motor cut-out, hi/low beam, turn signal, hazard switch. | |
| 〃 | Turn signals | Operation | No cracks; flashes with left and right turn signal switch usage; resets per switch. | |
| 〃 | Mirrors | Condition | No cracks; clean, mount and swivel joints are tight | |
| 〃 | 〃 | Aim | Check/adjust while seated on the bike off the kickstand. | |
| 〃 | Wiring | Condition | No fraying or chafing; insulated. | |
| 〃 | 〃 | Routing | No pinching, interference, or pulling at the steering head or suspension; wire looms and ties in place; connectors tight and clean. | |
| Oil & Fluids | Hydraulic Fluid | Level | Check front and rear reservoirs | |
| 〃 | 〃 | Cleanliness | Check whether the fluid is very dark, foamed, or has water | |
| Chassis | Frame | Condition | No cracks at gussets or accessory mounts; no paint lifting | |
| 〃 | 〃 | Steering-Head Bearings | No detent or tight spots through full travel; raise front wheel and check for play by pulling/pushing forks. | |
| 〃 | 〃 | Swingarm Bushings | Raise the rear wheel and check for play by pulling/pushing swingarm. | |
| 〃 | Suspension | Front Forks | Smooth travel, equal air pressure/damping, anti-dive settings. | Left & Right |
| 〃 | 〃 | Rear Shock | Smooth travel, equal pre-load/air pressure/damping settings, linkage moves freely and is lubricated. | |
| 〃 | Belt | Tension | Check at tightest point | |
| 〃 | 〃 | Alignment | Check position on rear sprocket; spin the wheel to check changing position | |
| 〃 | 〃 | Sprockets | Teeth not hooked or chipped; clean and securely mounted | |
| 〃 | Fasteners | Threaded | Tight; none missing; check for corrosion | |
| 〃 | 〃 | Clips and Pins | None broken or missing | |
| Stands | Side Stand | Condition | No cracks; not bent; cutout switch equipped and working | |
| 〃 | 〃 | Retention | Springs into place; tension holds position up or down |
Fastener Maintenance
To maintain the fasteners (bolts and screws), always check for loose or corroding bolts.
Torque
- For torques, see Fastener Specifications, which gathers all the officially recommended torque and other settings for various fasteners.
Locking
- Use blue Loctite threadlocker for non-conductive bolts.
Corrosion
TODO: recommend a corrosion inhibitor.
Source: zeromanual.com/wiki/FST_Platform/Unofficial_Service_Manual · Wayback capture of 2025-05-17 · wiki last edited 2 May 2020 00:04. Community-written content from the Unofficial Zero Manual, reproduced for preservation; not written or verified by OpenZero. Links to pages that were not mirrored go to the Wayback Machine.