Wheels
Wheel Maintenance
Tire Pressure Check
Maintain minimum pressure per the official manual.
General guidelines
- Higher tire pressures help stability and reduce rolling resistance with a passenger or a lot of luggage, but lower pressures help on rougher/gravel surfaces.
Excessive tire pressure can make the tire too sensitive to sharp debris or potholes, and increases the risk of a puncture.
45psi is where this definitely becomes a concern; modulate depending on your riding, and definitely use much lower pressures for offroading. - Official recommendations are for cold tires, which means when they haven't been ridden in a few hours.
As tires warm up from riding, pressure increases due to the interior air heating from friction and mechanical work on the tire by the road against the wheel.
Front Wheel
The front wheel for Gen2 models has a few variations and sizes (mirroring the rear wheel).
- 2013-2014 DS and FX models have spoked construction, a holdover from Gen1 offroad models.
- 2013-2014 S and SR models have a very simple construction that is like cast/mag wheels but seems welded, a holdover from the 2012 S model.
- 2015+ FX models retain the spoked construction but are revised.
- 2015+ DS and DSR models have cast/mag wheel construction and 19" diameter.
- 2015+ S, SR, and FXS models have cast/mag wheel construction and 17" diameter.
| Years | Models | Construction | Diameter | Dimensions |
|---|---|---|---|---|
| 2013+ | FX | Spoked | 21" | |
| 2013-2014 | DS | Spoked | 19" | |
| 〃 | S, SR | Cast/mag with welds | 17" | |
| 2015+ | DS, DSR | Cast/mag | 19" | |
| 〃 | S, SR, FXS | 〃 | 17" |
Front Wheel Removal
Video Instruction
Zero DS front wheel removal by Nigel Morris on YouTube:
Zero Motorcycles: Front Wheel Removal 2016 DSR by E Shattow on YouTube:
Tools
6mm Allen Wrench - Axle bolt (M17)
5mm Allen Wrench - Pinch
13mm Socket - Brake calipers
Steps
- Loosen both brake caliper bolts using the 13mm socket.
- Loosen both right pinch bolts using the 5mm allen wrench.
Alternate slightly, turning each counter-clockwise. 3. Loosen the axle bolt using the 6mm allen wrench. 4. Loosen both left pinch bolts using the 5mm allen wrench.
Alternate slightly, turning each counter-clockwise. 5. Securely lift the front wheel. 6. Remove both brake bolts using the 13mm socket, and lift and secure the brake caliper without stressing the brake lines. 7. Continue to back off the pinch bolts, but do not remove, using the 5mm allen wrench. 8. Remove the axle bolt and outer spacer using the 6mm allen wrench. 9. Replace the axle bolt with the 6mm allen bolt, turning several turns inward, without the outer spacer. 10. Push on the axle bolt while encouraging the left side of the axle out.
Support the wheel to reduce binding!
- Remove the axle.
- Remove the wheel.
Front Axle
TODO measurements
Front Tire
See Stock Tires.
Front Bearings
The front wheel has 2 bearings of the same size as the 3 rear bearings (see table there for sizing).
TODO
Spacer specs
Front Bearing Replacement
This replaces the front wheel bearings on Gen2 models.
Tools
- 6mm Allen Wrench - Axle (M17)
- 5mm Allen Wrench - Pinch
- 13mm Socket - Brakes
- Bearing Press Tool/Kit
Steps
- Remove the Front Wheel
- Remove the spacers, then the dust seals, from each side and clean.
- Press the bearings out from the opposite side.
A socket extension works well, alternating around the perimeter. 4. Clean the inner wheel. 5. Press the new bearings in, aligning with the inner axle tube.
A large socket works well to press only on the outer bearing. 6. Replace the dust seals. 7. Return the wheel to the bike. 8. Aligning the axle with the spacers, press the axle back into the forks. 9. Expand the brake calipers to prepare for remounting. 10. Remount brake caliper with the 13mm socket to the correct torque. 11. Return the outer spacer and make the axle bolt snug with the 6mm allen wrench. 12. Alternate tightening each 5mm pinch bolt. 13. Ensure proper wheel movement. 14. Tighten left pinch bolts to the correct torque using the 5mm allen wrench. 15. Tighten the 6mm Axle bolt to the correct torque. 16. Tighten right pinch bolt to correct torque using the 5mm allen wrench. 17. Ensure smooth movement. 18. Pump the brakes to return to proper action. 19. Lower the front wheel. 20. Confirm torques. 21. Test ride! 22. Reconfirm torques. 23. Paint the bolt heads to so that any loosening is detectable.
Rear Wheel
The rear wheel for Gen2 models has a few variations and sizes (mirroring the front wheel):
- 2013-2014 DS and FX models have spoked construction, a holdover from Gen1 offroad models.
- 2013-2014 S and SR models have a very simple construction that is like cast/mag wheels but seems welded, a holdover from the 2012 S model.
- 2015+ FX models retain the spoked construction but are revised.
- 2015+ S, SR, FXS, DS, and DSR models have cast/mag wheel construction and 17" diameter.
| Years | Models | Construction | Diameter | Dimensions |
|---|---|---|---|---|
| 2013+ | FX | Spoked | 18" | |
| 2013-2014 | DS | Spoked | 17" | |
| 〃 | S, SR | Cast/mag with welds | 〃 | |
| 2015+ | DS, DSR | Cast/mag | 〃 | |
| 〃 | S, SR, FXS | 〃 | 〃 |
Rear Tire
See Stock Tires.
Rear Wheel Removal
Pulling out the axle and removing the rear wheel is straightforward; the complexity is in re-assembly: see Rear Wheel Install.
Items to note for re-assembly
Note how the caliper sits against the swingarm.
Note the order and arrangement of the spacers.
Video Guide
Zero Motorcycles: Rear Wheel Removal 2016 DSR by E Shattow
Tools
- 27mm socket
- Breaker bar
Instructions
- Place the motorcycle on a lift or rear stand so the wheel spins freely.
- Mark/photograph where the alignment marks reside on each side of the axle for re-alignment when re-installing the wheel.
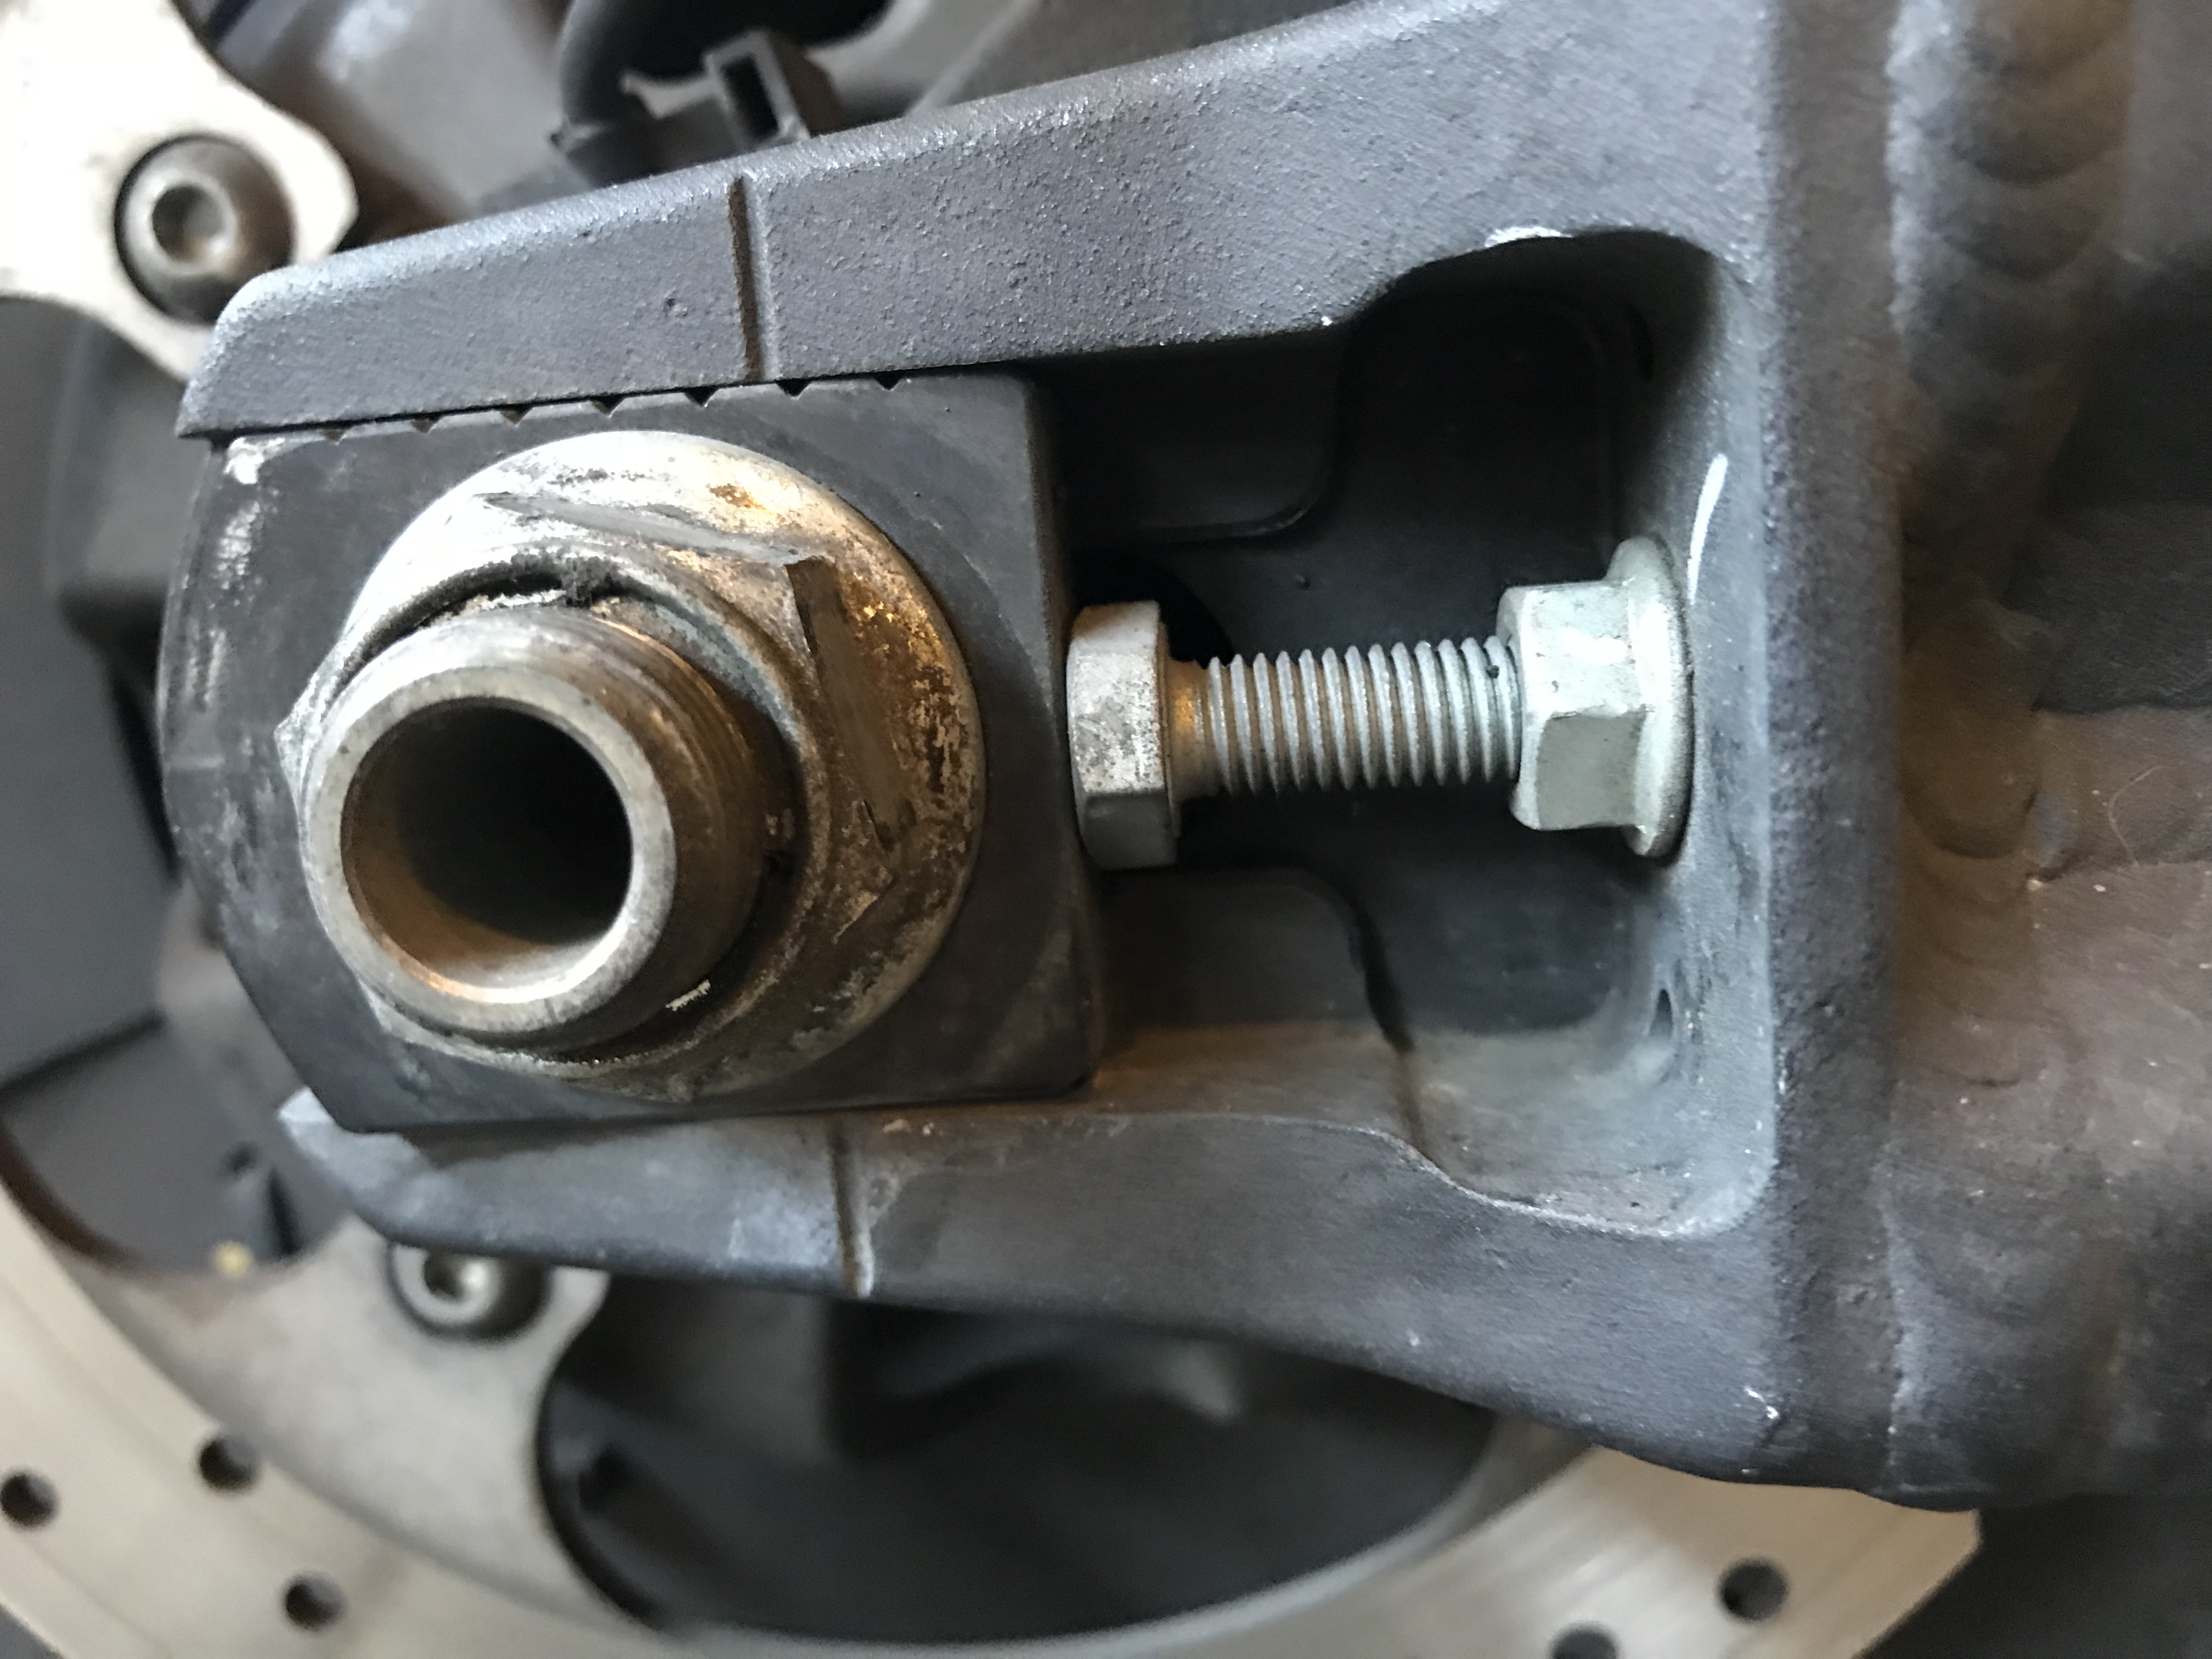
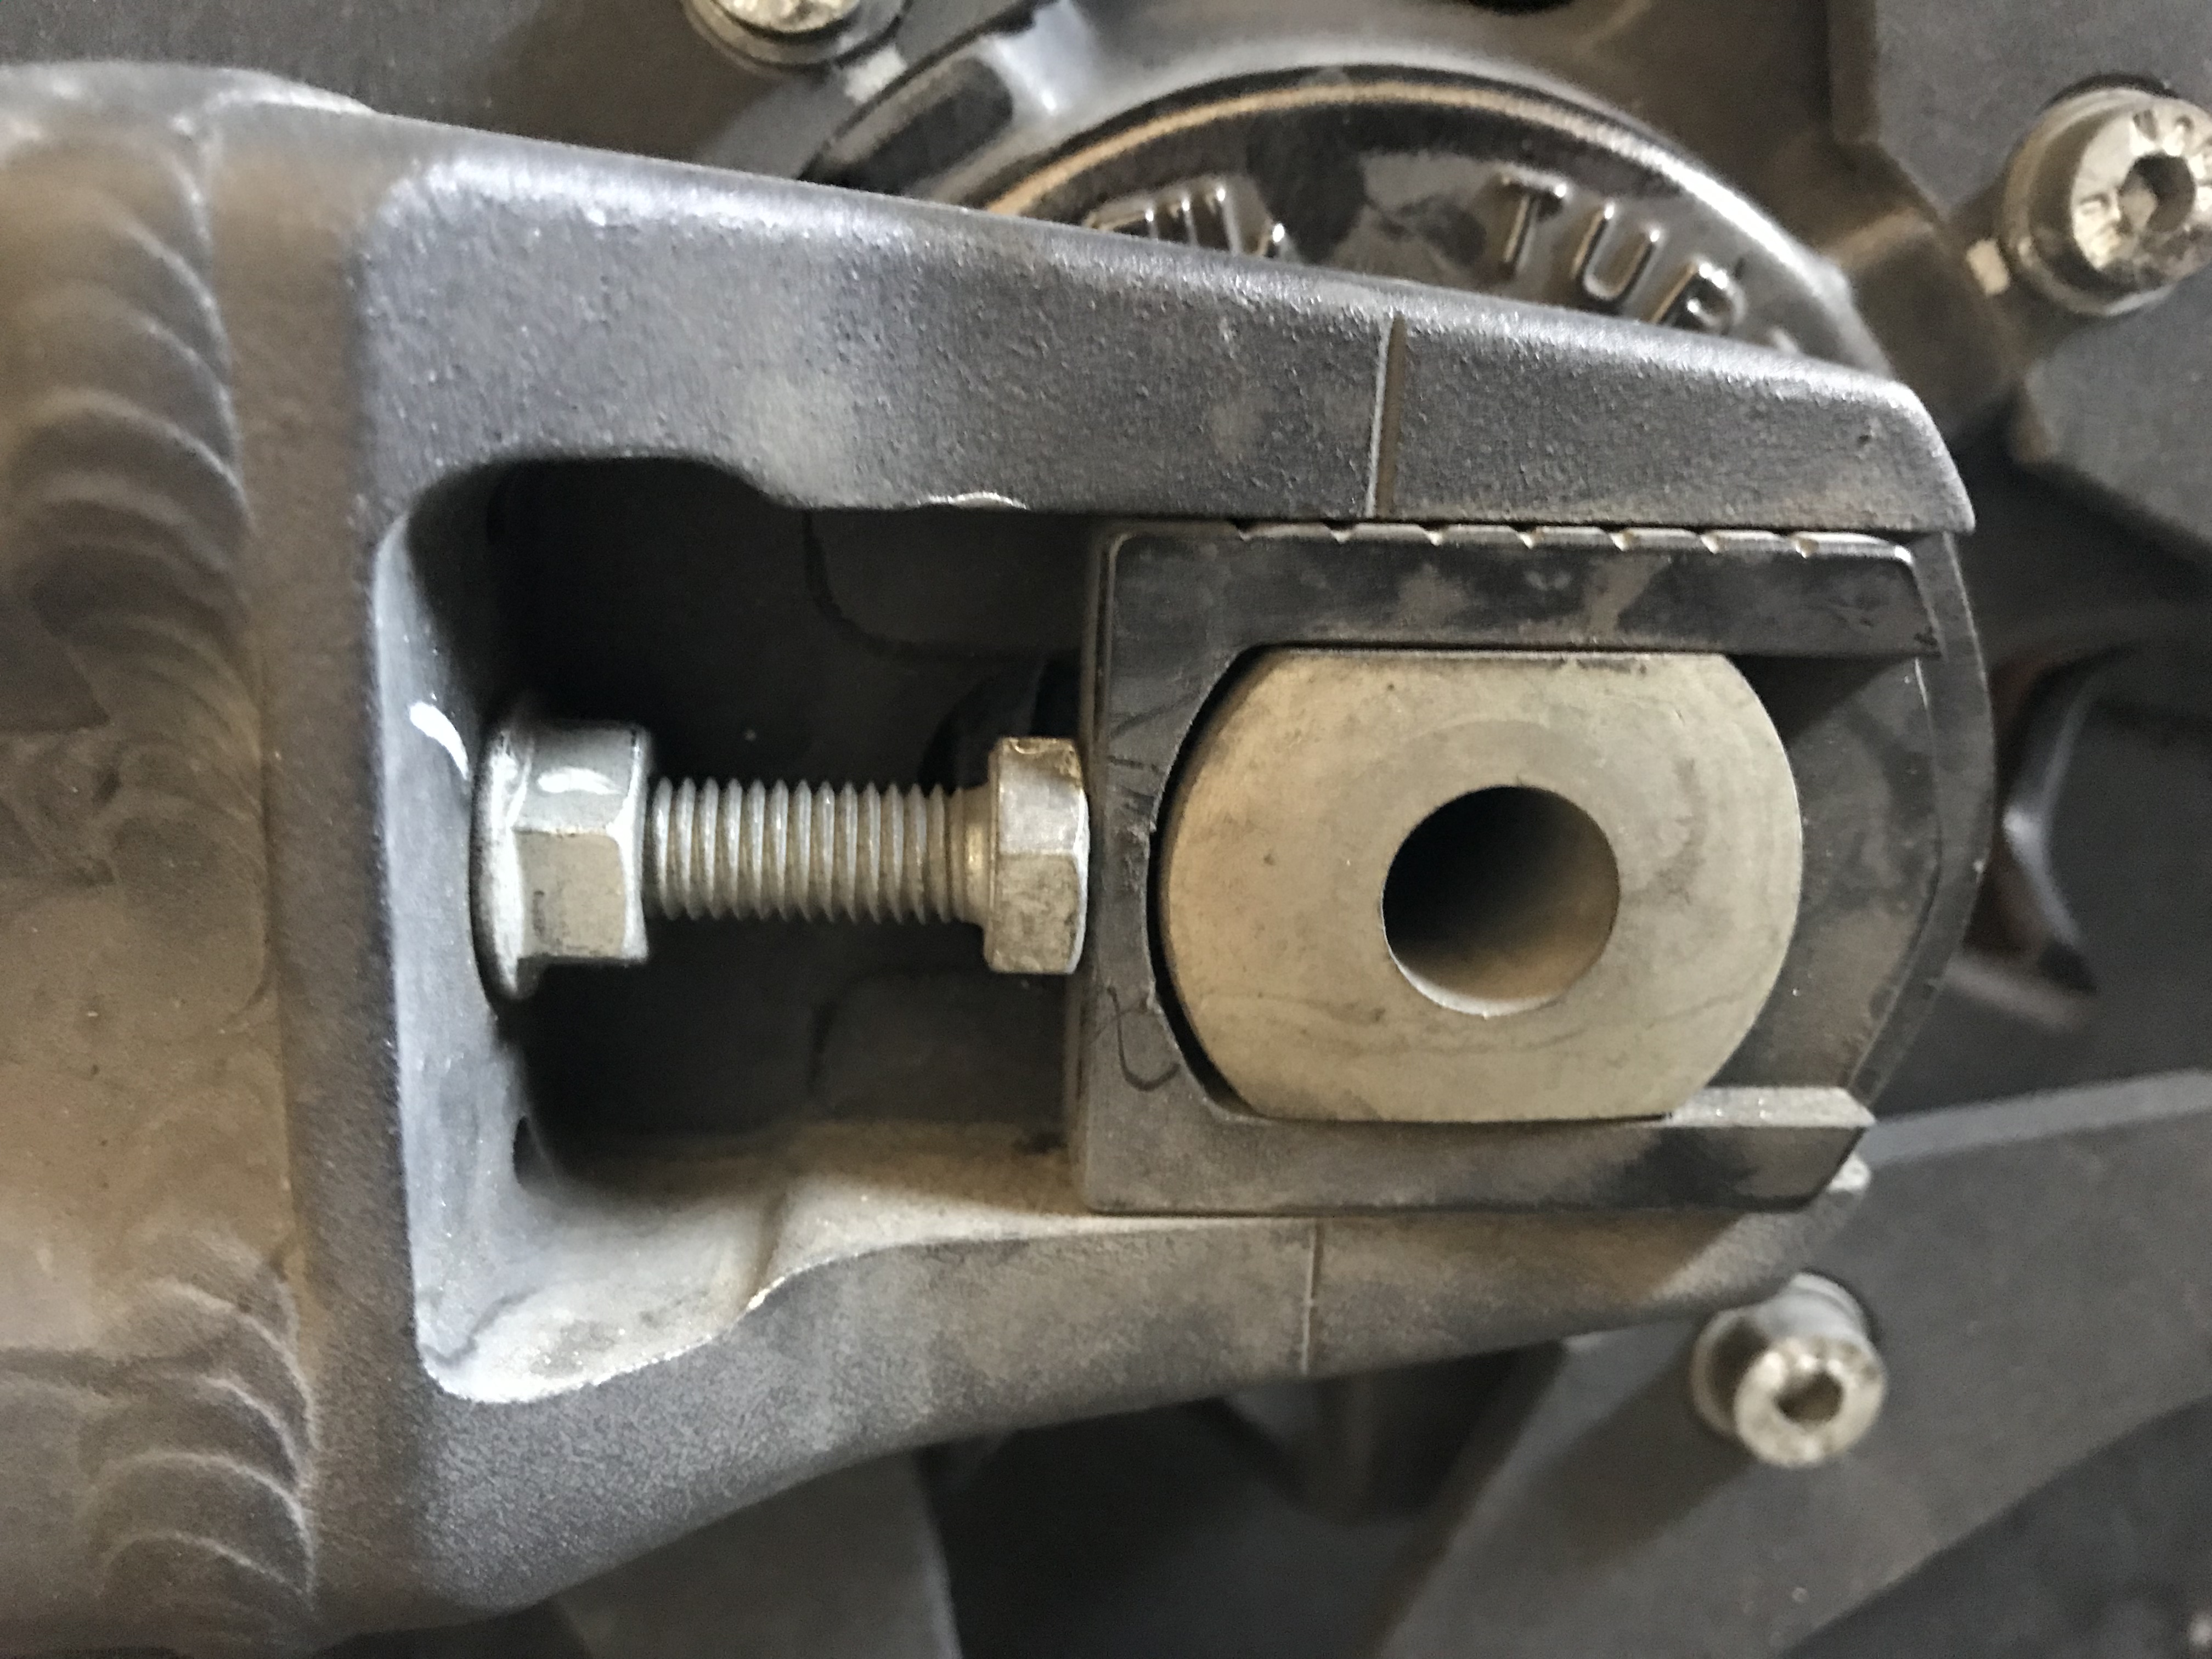 3. Loosen the rear axle nut on the right side (27mm) with the breaker bar.
4. Remove the rear axle nut.
5. Pull the axle part-way out so that the wheel can be moved forward enough to loosen the belt.
6. Pull the belt off of the rear sprocket and let it hang outside of the swingarm slightly to avoid interfering with the wheel.
7. Pull the axle through the wheel from the left side.
Pay attention to the brake caliper: it's attached via the axle, and when the axle is removed the caliper, etc, will come loose. 8. Set aside the spacers with alignment marks, noting which goes on which side. 9. Set aside the axle and axle nut. 10. Pull the wheel out behind the swingarm.
The license plate tail holder will likely require rolling the wheel out at an angle to clear it.
Rear Wheel Install
Re-installing the rear wheel requires somewhat careful fitment of the wheel, spacers, ABS sensor (2015+), and brake calipers within the swingarm.
Pay attention while removing the wheel to have this arrangement in mind to avoid confusion.
Any play in the caliper position or the wheel itself could have a dramatic and damaging effect on the motorcycle while riding.
Tools
- 27mm socket
- Torque wrench set to 75ft-lbs (102Nm)
- (Optional) rubber mallet to nudge the axle
Instructions
-
Also see Belt Adjustment
-
Ensure that the axle has grease applied if it is dry, to minimize friction and wear against it under load.
- Push the axle through the alignment bracket and left swingarm until flush on the inside of the left swingarm.
- Place the rear brake caliper holder onto the right swingarm.
- For 2015+ models, place the ABS rear wheel speed sensor on the inside of the rear brake caliper holder.
Route the wire feeding the speed sensor around the caliper holder bracket and ensure that the sensor and wire will install without tension or excessive bending. 5. Roll the wheel into position inside of the axle.
Ensure the speed sensor on the right side mates with and covers the rear wheel bearing before it aligns with the rear brake caliper holder on the right side, as this "sandwiches" together.
Ensure that the brake calipers are pushed to maximum expansion, then place them around the rear wheel brake disc on the right side. 6. Push the axle through the wheel by hand or use a rubber mallet to gently nudge the axle through the wheel.
You may need to give the wheel a wedge underneath to rest on to minimize any stress on the axle while aligning it fully. 7. Align the right side of the wheel with the swingarm axle hole and brake caliper holder on the right side. 8. Again, manually push or nudge with a rubber mallet the axle through the speed sensor, rear brake caliper holder, and right swingarm. 9. Run the belt over the rear sprocket.
Center the belt over the sprocket so it has about 1mm on either side. 10. Ensure that all components are aligned correctly before attempting to tighten the axle or even before mating the left axle end with the swingarm (which tightens the belt). 11. Place the axle nut onto the right side of the axle by hand. 12. Note the alignment of the left and of the axle's rectangular tabs; hold it in a horizontally aligned position so that tightening the axle nut places it inline with the swingarm slot. 13. Tighten the axle nut (27mm) with the torque wrench to 75ft-lbs.
Ensure the alignment of the axle head on the left side is horizontal and pulls the belt under tension smoothly.

Check belt tension per the [belt adjustment procedure](https://web.archive.org/web/2025/https://zeromanual.com/wiki/Belt_Adjustment).
Rear Bearings
The rear wheel contains 3 bearings and dust shields.
| Years | Platform | Kind | Type Code | Measurements | Lifespan (guide) |
|---|---|---|---|---|---|
| 2012-2014 | S | Unsealed | 6904-2RS | 20x37x9 | ~20,000 miles |
| 〃 | X | 〃 | 6204 | 20x47x14 | 〃 |
| 2015-2020 | SDS | Sealed | NSK 6204DU | ~50,000 miles | |
| 〃 | XMX | 〃 | 〃 | ||
| 2020- | FST | 〃 |
References
Precision bearings & replacement.
Anyone know front wheel bearing size.
Ceramic bearings for a 2014SR, with success reported for at least as long as the original bearings. The author is going back to steel.
Per Terry Hershner
The 2012-2014 wheel bearings are 6904 bearings which are bicycle sized bearings.
They lasted me about 20,000 miles per set.
Best is to use a 2015 wheel on the 2014 which will work but requires modification of the spacers.
I did it on my 2012. It now has 2015 wheels.
Rear Bearings Replacement
Rayivers on Wheel bearing replacement ('14 FX, 6904 bearings)
Removal was pretty straightforward with a Motion Pro blind bearing removal kit.
Pullers like these are the only way I know of to remove wheel bearings without risk of damage to the hub or center spacer
They pull against the small chamfer on the inner-race I.D.
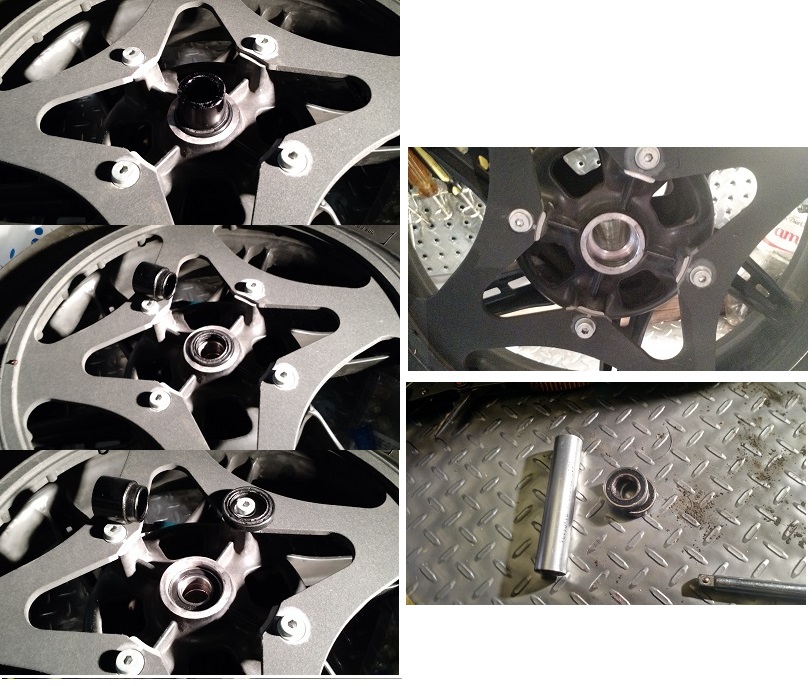
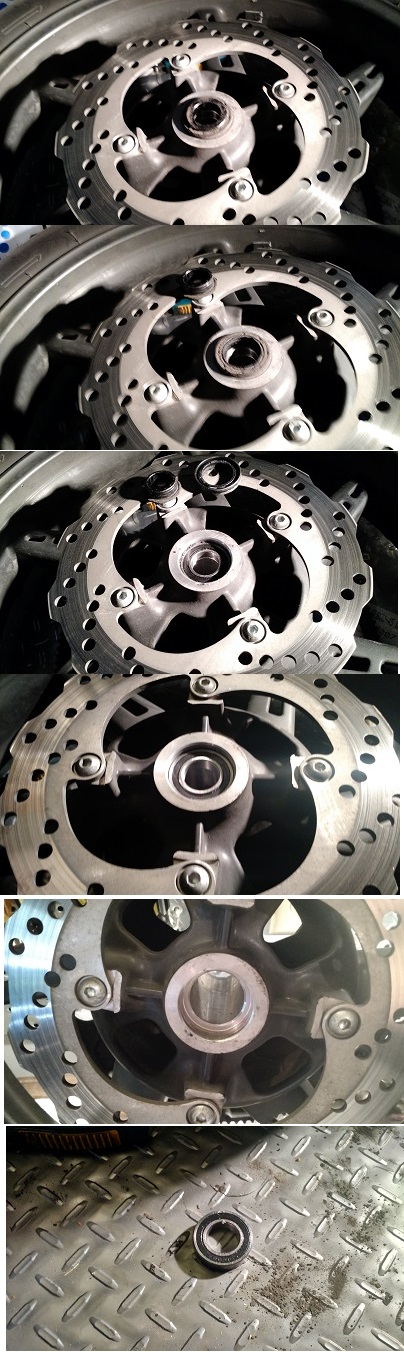
Greg Hassler reports
"I use my brake caliper piston puller, 20mm size works great." https://www.klsupply.com/general-equipment/brake-caliper-pist-puller-set-35-6885.asp
Togo found this tool to work well for 6904-2RS on 2014 Zero SR
https://smile.amazon.com/Wheels-Manufacturing-Sealed-Bearing-Extractor/dp/B00NIPRNA4/
See Also
Source: zeromanual.com/wiki/XMX_Platform/Unofficial_Service_Manual · Wayback capture of 2025-09-10 · wiki last edited 4 November 2020 02:21. Community-written content from the Unofficial Zero Manual, reproduced for preservation; not written or verified by OpenZero. Links to pages that were not mirrored go to the Wayback Machine.